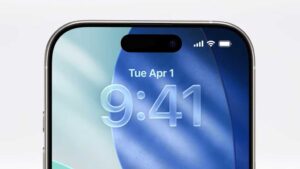
In March 2026, Apple released some new hardware and the anticipated update to the MacBookAir M4 is now the released as the MacBookAir M5 in 13″ and 15″ versions.
Four colours: Sky Blue,Silver,Starlight, andMidnight (still shows finger prints).
10 Cores, 16, 24 or 32 GB memory options, 512GB, to 4TB storage (all based the processor choice) maxxed out would be $2899 (not including tax or Applecare+ plan)
So I picked up a 16GB/512GB model and its now on Tahoe 26.4 (came with Tahoe 26.3.1).
Its snappy, light, I got an Incase cover (smoke) and took it on a trip South, to visit family and watch my youtube subs in the hotel room. Battery life is long..like I went 8 hours of watching shows and still had 40% left. Two thunderbolt 4 ports and Magsafe 3. Kinda disappointed the included charger was not the model with TWIN usb-c charging ports, however its a new 40Watt Dynamic charger up to 60Watts. Wifi is verison Wifi7. Bluetooth 6. If you want the specifications, visit Apple’s MacbookAir.
I’m updating the site less and less for now, but I wanted to include this mac purchase since no interest and no money involved on my Apple Card. Tax was about $77 (PA). Also a shout out to the Willow Grove Park Mall Apple Store, Willowgrove PA. Staff were above Excellent and just amazing staff.
“Yes, Devin. Glad to hear JC ordered this for you, and hope all is well” – ES
Apple released iOS 26 a few months ago. And with it, a slew of new features and transparency that no one asked for. As if a small handheld display was hard enough on the eyes, this new iOS26 LiquidGlass (more like Ass than Glass) defines the arrogance of change for you, whether you wanted it or not.
Let me explain that some are questioning why the move or jump from iOS 18 to iOS 26? Plans of the leadership at Apple! Make it less confusing for already their dumbing down of customers, to make the iOS and MacOS on the same number (a year! how clever! Wait, Microsoft has been doing that. So has EA Sports games! )
So yes, you noticed, iOS 26 (for 2026, but released in 2025?).
Now, let’s just go to settings and turn off some, but not all, of the new features, shall we?
Reduce transparency in IOS:
Open the Settings app, scroll down and tap on Display & Brightness. Now tap on Liquid Glass.
Choose from Clear or Tinted. Choose the second option to limit Liquid Glass. Apple says, “Clear is more transparent, revealing the content beneath. Tinted increases opacity and adds more contrast.”
Choosing this change won’t walk your iPhone back to the look of iOS 18. Backgrounds in pop-up windows are much less clear, but they aren’t completely opaque.
Open the Settings app on your iPhone and head to Accessibility > Display & Text Size, then enable the toggle next to Reduce Transparency. You’ll notice that this immediately cuts out a lot of the glass-like effects in iOS 26, such as the translucent Dock and app folders.
Disable Large ScreenCapture Previews:
Open the Settings app and navigate to General > Screen Capture and disable the toggle next to Full-Screen Previews. From now on, you’ll go back to seeing the miniature preview in the corner of your iPhone whenever you take a screenshot.
Disable Background in Messages:
Select Settings -> Apps > Messages, then find the Conversation Backgrounds toggle and disable it. This will restore the plain white background from before iOS 26 on all your threads.
Spatial Scenes in Lockscreen and Photos:
Start off by long pressing your Lock Screen, then tapping Customize. To the left of the … button should be a hexagonal icon that contains a landscape scene – tap it to disable the effect. You can do this with other images by tapping the background thumbnail in the bottom-left, selecting Choose Photos, then picking an image and tapping the same hexagonal icon to disable the Spatial Scene.
To prevent Photos from turning your images into Spatial Scenes in the first place, open the Settings app and go to Apps > Photos, then scroll to the bottom and disable the toggle next to Control for Creating Spatial Photos.
Call screening and call waiting:
Spam calls – Apple has taken steps to combat them in iOS 26. In the form of call screening—which forces unknown callers to identify themselves before they get though to you, giving you the option to decline the call—and call waiting, which sits on hold on your behalf before ringing back when you’re through to a human.
You might decide that these features aren’t right for you. If you don’t get much spam (Ha!) and would rather not inconvenience people calling you, you might want to disable call screening, for example. (Note that it only works on unknown callers, so your family and friends would probably never encounter it.) Thankfully, that’s easy to do in iOS 26.
To turn off call screening, open the Settings app and head to Apps > Phone. Scroll down to the Screen Unknown Callers section and tap Never. Alternatively, you can choose to silence calls from unknown numbers completely and send them to voicemail, or just stick with Ask Reason for Calling.
For call waiting, you’ll find options for this in the same Phone menu. Next to Detect Call Waiting, simply disable the toggle to deactivate the feature.
Classic Look in Phone calls:
Change from Unify to Classic via the three lines in upper left. Open the Phone app and select the menu icon at the top right of the screen. In the window that pops up, check the “Classic” option. Your app should now change back to the older (less transparent) look.
Change the App Icons
App icons in the Liquid Glass look lose their individual colors and become more uniform, hindering easy identification and readability. Here’s how to change that.
Press and hold on your Home Screen. Tap the “Edit” icon in the top-left corner. Choose “Customize” from the dropdown menu. For the classic look, click the “Default” option. Your icons should revert to the way they were.
So I finally was able to find a local Apple store that had in stock, a 256GB model that was unlocked. Helpful Apple staff at the Menlo Park Mall store explained that stock was low for this model all over, but that the 512GB and 1TB models were plenty. Also, getting one unlocked was rare too, as most stock was for carrier models (ATT/tMobile/VZW). Thus explaining the reason I couldn’t find an unlocked, 256GB model.
I took the phone home and did the upgrade/transfer without Apple support. I had a backup but the transfer of putting new next to old worked well with ONE BIG CAVEAT: your MFA apps like Google Auth, Duo, MS and Y Auth, do NOT carry your settings over! I am so glad I had my old phone and DID NOT WIPE to get all my accounts reconfigured. I think I should have just did a restore from my iTunes encrypted backup. However I don’t know how that would go from a iOS 15 version to the iOS 26 if so on the new iPhone.
Quick Summary: its much snappier with Carplay, but issues now point to my Mazda infotainment than the phone. Magsafe charging, USB-C connection and phone holder is much better than previous SE2020 which had no Magsafe, was still Lightning connector, but did charge slowly on a Qi charger. Its wider than the SE and thus my jeans side pockets have some issue with fit (so far just the one pair). Fit my 5.11 pants fine on side or front pocket. Camera is wonky to get focus on close versus far objects – macro kicks in too slow. I don’t mind the blue but with a case, its moot. I keep hitting the mic button on texting… Apple’s keyboard in Messages is still subpar.
Why do my songs STILL have artwork issues? I’ve tried a web suggestion to delete all art and restore but somehow some artists albums get wrong art from Apple?
Apple released the iPhone 17 models for availability on Sept 19th, 2025
As of Oct 6th, I still cannot buy one in the store. Any Apple store. Atleast the 12-15 that are within my 100mile radius.
I suspect that the reason is, I want the Pro model, not the Max, and with 256GB of storage. And unlocked from all carriers. I don’t want ATT. Nor Verizon or Tmobile. I want an unlocked phone because… I want to add eSim second number to the phone. You cannot add another number, via eSim without it being unlocked from the carrier. If I place an order for one from Apple, it shows that I can have the phone by Oct 28th. Which is more than a month since Apple announced it being available to the public.
Contacting ATT store, they have stock. Called Verizon store, they have stock. BUT only for them, as carrier.
Also note that lower models, not the Pro or Pro max, you have to pay additional money to have an unlocked phone. So that iPhone 17 or iPhone Air, unlocked, is more than the advertised price.
MacOS 26 Tahoe is the newest version of macOS reported at the June WW Dev Conference, set to launch this fall. MacOS 26 follows MacOS 16 aka Sequoia, with Apple streamlining the numbering for all of its operating system updates.
(The following information was gathered from news sites like MacRumors, 9to5Mac, etc)
iOS 18 will jump to iOS 26. All in favour of the “year” aka 2026. Along with tvOS, Watch OS…
MacOS Tahoe, like iOS 26, adopts Apple’s new Liquid Glass material design. Liquid Glass is translucent and it behaves like glass would in the real world, reflecting light and the color that’s behind it.
Liquid Glass extends to desktop icons, folders, the Dock, in-app navigation, menus, toolbars, and the Control Center. The menu bar is translucent, revealing more of the display so it feels larger.
The Control Center is customizable, as is the menu bar, and users can adjust the layout and choose what apps and controls appear in both places.
There are options to set colors for folders, app icons and widgets. App icons support light and dark tints, and the same clear look that’s available on iOS. Folders can get colors and emoji characters, making them more recognizable at a glance.
Safari has an updated tab design that’s rounded and floating in the toolbar, with a new look for tabs and favorites. The sidebar has been redesigned to make it easier to find saved content like iCloud Tabs. Apple also made Safari faster, and it is 50 percent quicker at loading frequently visited websites than Chrome. It’s more secure, too, with Apple adding advanced fingerprinting protection in all browsing by default.
*If you fill out for online, each bureau will want an account if you don’t have one, along with texting you codes or links to verify. Make sure to make an account and pwd with a password manager like 1Password, which allows notes for things like Pins or Secret Question Answer.
This month, Apple without much fanfare, released the replacement to the iPhone SE model as the iPhone 16e. And A18 processor in an aluminum frame similar to the iPhone 14. A new model, the C1, an inhouse Apple modem. No more home button. That is gone. Downside is that its more than the SE 2020 (3rd edition) in cost. Apple is selling this as base model iPhone 16e 128GB for US$599. The previous SE 2020 (64GB) was US$429. So US$171 more. YMMV.
Update: Youtubers and review sites, Reddit, all pretty much agree that the price is a disappointment. The SE was the “affordable” iPhone. Tim Cook says “its affordable!” but only when you compare it to the $US1200 models. Sure! It’s 50% less! One lens vs three! Ok, it has USB-C. Face recognition. Better but not brighter display. And again Apple engineers its prices in that you can’t get a refurb model 15 or even 16. Shame on you Apple.
Next, Apple announce something in the Air teaser and it was the iPad Air, along with the iPad models (starting at US$299 and 128GB storage/wifi). There is also a new Magic Keyboard for the new models. The Folio for the iPad is…well..US$249..almost as much as the iPad. Apple prices its accessories and tablets to not compete with its laptops. Think Different? More like Think Next Model to upgrade to.
Then Apple released the new MacbookAir M4. This model is light, offered in Sky Blue now, and more memory and cheaper by US$100 versus last M3 model. Ready for Apple Intelligence, longer battery life. 13″ and 15″ model sizes. This is the notebook you need if you write, surf, facetime or zoom, and do lightweight work. And lightweight it is. If I needed a notebook, this would be ideal. I can see students snapping this up. Ok, only 2 USB-C ports, a magsafe port and headphone jack port (I’d rather have one more USB-C/Tbolt port since “most” headsets are wireless buds or over the ear now.
And as of Wednesday, March 5th 2025, the next announcement is the Mac Studio Pro in M4Max and M3 Ultra. Pricier. Really pushing Apple Intelligence. No longer can you get base model with 64GB as you need to bump up to more cores. I’ve an Mac Studio M2Max model, 64GB and 2TB that was US$2699 (8/3/2023). That same configuration for the M4Max model, 64GB and 2TB today is US$3299. Why is this model now US$600 more??? 0.8x faster than…my current M2Max. Oh and it now has Thunderbolt5 ports. Two more cores than my M2Max. Ok, so Wifi6, and 10Gb included, with Bluetooth 5.3. Not going to say it loudly but, not worth US$600 more. Oh and the trade in value of my computer to Apple?… US$1006.
I can wait till the M7Max… wonder if my Applecard will still get 0% financing in 2028…
So Apple released 15.3 a week ago, which one of its most important fixes was for its firewall issue with Crowdstrike’s Falcon firewall in enterprise/institution/business customers installations.
Imagine not being able to connect to Airplay after finding the device on your network, then connecting, and entering the 4 digit code and … and… nothing! Well, the tempfix was to drop your pants, aka, open the firewall. The 15.3 update fixed what the last 15.2 update dorfed up.
And today, 2/10/2025 or 2025/10/2 or 10/2/2025 aka Feb 10.2025, Apple released 15.3.1, along with Watch OS 11.3.1 and iOS 18.3.1 to block the Restricted USB Mode Attack. Apple never likes to detail any “security” patches but they did say,
“This update provides important security fixes and is recommended for all users.”
I updated my devices. Probably good idea.
Speaking of rumors…maybe soon, SE 4thGen ? IF bigger screen… time to upgrade!Stay tuned.
Just a reminder that the internet websites that deal with Apple products, news and reviews…are clickbait ad-revenue generators FIRST. Any site that spreads rumors about the newest possible Apple release iPhone model, that isn’t out, is just about you clicking their link, watching their AI-generated text and/or video and all about not being accountable for a bogus “rumor”.
Rumor Psychology: Social and Organizational Approaches, expert rumor researchers Nicholas DiFonzo and Prashant Bordia investigate how rumors start and spread, how their accuracy can be determined, and how rumors can be controlled, particularly given their propagation across media outlets and within organizations. Exactly what is rumor, and how does it differ from gossip? Even though these terms are commonly used interchangeably, they differ greatly in function and content. Whereas gossip serves to evaluate and shape the social network, rumor functions to make sense of an ambiguous situation or to help people adapt to perceived or actual threats. Why do people spread and believe rumors? (text from ResearchGate)
So we humans look for a solution or perception of on, and in a panic, need to find if something exists and be the first to have, to satisfy. And thus, even the web has a solution for that: its not a lie, its just a rumor. Just a possible speculation that others might want to … believe.
So just STOP it. Stop clicking videos. Stop believing that some web site has information before an actual Fortune 500 company, worth trillions, has released it. While there might be a wallstreet reporter that is in with Apple’s blessing…doubtful because there are laws and SEC rule about stock prices and insider trading. Sure, maybe some Chinese factory that is deceitful could release images of Apple’s manufacturing dies or models…but Apple would have that place shutdown or the PRC would execute/reprogram that factory manager… but leaks are possible.
So you and others need to stop rumors. Who cares? You know each year Apple will release something. With the new Silicon chips, its now an annual number..M1, M2…M4, then M5, etc. Will there be a folding phone? Maybe research the failure and problems Samsung’s fold models have…like delaminating screens and fold lines. And that most should take replacement warranties out because you are lucky if that folding phone lasts 12 months of functionality.
Rumor has it that someone is making money off you. Yup. So Happy New Year!
A new app that lets you use concepts, descriptions, and people from your photo library to create fun, playful images in multiple styles
Swipe through previews and choose from as you add concepts to your playground
Choose from animation and illustration styles when creating your image
Create images in Messages and Freeform, as well as third party apps
Images are synced in your Image Playground library across all your devices with iCloud
ChatGPT support
ChatGPT from OpenAI can be accessed right from Siri or Writing Tools
Compose in Writing Tools allows you to create something from scratch with ChatGPT
Siri can tap into ChatGPT when relevant to provide you an answer
A ChatGPT account is not required and your requests will be anonymous and won’t be used to train OpenAI’s models
Sign in with ChatGPT to access your account benefits, and requests will be covered by OpenAI’s data policies
Additional Apple Intelligence features:
Describe your change in Writing Tools allows you to suggest how you’d like something rewritten, for example as a poem
Photos
Favorites album appears in the Utilities collection in addition to Pinned Collections. Recently Viewed and Recently Shared album history can be cleared
Safari
New background images to customize your Safari Start Page
HTTPS upgrade tries to use secure HTTPS on all websites
Simplified import and export for history, bookmarks, and passwords
This update also includes the following improvements and bug fixes:
Share Item Location in Find My helps you locate and recover misplaced items by easily and securely sharing the location of an AirTag or Find My network accessory with trusted third parties, such as airlines
Natural language search in Apple Music and Apple TV app lets you describe what you’re looking for using any combination of categories like genres, moods, actors, decades, and more
Favorite Categories in Podcasts allows you to choose your favorite categories and get relevant show recommendations that you can easily access in your Library
Personalized Search page in Podcasts highlights the most relevant categories and editorially curated collections tailored to you
Sudoku for News+ Puzzles provided in three difficulty levels and available for News+ subscribers
Presenter preview lets you choose what to share — an app or your whole screen — before you share it when connecting to an external display or using AirPlay
Pre-market price quotes in Stocks lets you track NASDAQ and NYSE tickers prior to market open
Weather in menu bar allows you to get current weather conditions from the menu bar on your Mac and click through to quickly access detailed forecasts